Powered by Blogger.
RSS
Showing posts with label tutorial. Show all posts

how to install drivers without cd

How to download the drivers that I will discuss this time may be spelled out very easy and very complete and very fast in the search for the driver, both drivers VGA, chipset, soundcard, Card Reader, USB devices, modems, Lancard, Wifi, Laptop Drivers, etc. other. For the problem of brand and type this trick can be used in all brands and types, and support all operating systems including windows seven, but this tutorial sayamenggunakan Windows XP Home Edtion
Here's How To Easily Download All Drivers Computers and Laptops:
1. Right-click My Computer select Properties. If the desktop does not exist My Computer, open Windows Explorer and right click on My Computer select Properties.


2. Click on Hardware then select Device Manager


3. After the Device Manager opens, select a driver who has not been installed, which is marked with a yellow question mark. Then right click on one of them eg Ethernet Controller (Lan Card), select Properties.


4. Setelah itu, muncul jendela properties dari device tersebut. Pilih tab Details trus Klik ID device. Kemudian copy ID dari device tersebut dengan menekan Ctrl + C.


5. Then, open www.devid.info site, then paste the device ID that has been copied in a box "Enter Device Id". Then click "OK"


6. Next will come some driver options that we want. Then select one. Then click the Download / Download.


7. Then download the driver with the nge driver who click on the line "FILE"


Similarly, discussion time on How to Easily Download All Drivers Computers and Laptops.
Good luck and good luck ...
READ MORE - how to install drivers without cd

  • Digg
  • Del.icio.us
  • StumbleUpon
  • Reddit
  • RSS

How to Reset Epson R220, R230C45, C90, C58, Cxx Blinking

Printer Resetter Epson Stylus R220, R230 Blinking. Here I am sharing Software Resetter Printer Epson R220 and R230 or Epson Printer Adjustment Program R220 and R230. The trick is similar to How to Reset Epson C45, C90, C58 and Cxx. But there are some things you need to edit on your PC so that software can work well. The ways the setting already there include the software does, you just download to read it.


Actually this is Resetter Software Trial Software but after going through the process of modification can be used eventually by doing so on the PC Settings.
Well for Epson Printer Resetter Software or R220 and R230 Adjustment Program:
SSC Service Utility, How to Reset Epson C45 Printer Cartridge. This article is my uploads because quite a lot of visitors who ask and have a problem with Epson C45 printer, especially on how to Reset Ink (ink) Cartridge him.
Usually when our printer ink (Epson C45) straight out we take the injections used by the doctor continued our content pack of ink. If I used nyuntiknya from his head cartridge syringe needles ... so I was off first. Injecting it quits after a drop of ink from the hole in the upper respiratory Ink Cartridge. After that we put again on the printer. Well ... the problem usually occurs here.
Usually Ink Cartridge Epson C45 Monitor will detect that the ink was still empty when only a fully charged so that the printer can not be used for nge-print. Well ... to overcome them should be reset at the Epson C45 printer ink cartridges are. There are 2 ways to do Reset cartridges are:
First use the Hardware (equipment) Ink Cartridge Epson C45 Resetter. This tool had been sold in computer stores for a while after leaving the Epson C45 printer. (I do not know what's sold today still have not). With this tool we can easily perform Reset Epson C45 Printer Ink Cartridge. Stay just step on to the Cartridge and wait for the light flashes from red to green and the cartridge is ready for use. Asthis.


n it there is the battery. But because the battery is empty and so not have to go back and forth I finally put up battery-oprek oprek. The depth of my pairs of 5.0-Volt stabilizer that can be given voltage from the outside using 9.0-Volt adapter. Hence there are two cables come out the same red-black.
Both use the SSC Service Software Utility_v4.30. A software that can be used to reset the Epson Printer Ink Cartridges including Epson C45 various types.
Below please on Download Software and Installation and Usage Guide.

READ MORE - How to Reset Epson R220, R230C45, C90, C58, Cxx Blinking

  • Digg
  • Del.icio.us
  • StumbleUpon
  • Reddit
  • RSS

how to install XP with flasdisk?

This time I will discuss about How to Install Windows XP with a flash. Maybe a lot of friends who also had to wear, but perhaps many do not know. Tutorial How to Install Windows XP with this flash can be 100% guaranteed. Want to know ...?
How to Install Windows XP with flash:
I. Prepare the ingredients: 1. OS Windows XP CD 2. Empty flash at least 1 GB (be careful of data in it will be deleted 3. USB file PREP8 + PeToUSB, the download link download MembuatFlashdiskBootableXP.rar (including Bootsect.exe) 4. Bootsect.exe file, the download link the same as in Rule 3 5. Other computers that use the O / S Windows XP with free space on drive C minimum of 1.5 Gb.
II. Plug in your Empty flash to the computer.
III. Extract the files you've downloaded MembuatFlashdiskBootableXP.rar on drive C directly.
IV. Run the file in the folder usb_prep8.cmd USB_Prep8 by double-click, so it appears like this:


Then press any key, and it will appear:


Continue Click on START =>> YES =>> YES, then the process will soon begin the format and the flash will be formatted into the boot flash. Wait till out of the box: "Operation Completed Successfully". Means the formatting is complete. Then close it but DO NOT CLOSE PeToUSB DOS window behind him ...
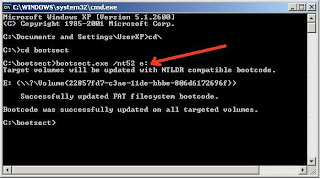
V. Sign in RUN and type CMD then enter. Then run the file in a folder bootsect.exe bootsect with DOS command that has just opened it. This is done to give the flash boot file manager. How: 1. After entering DOS, change the active directory into an existing folder bootsect dirve it. 2. Then after activation in c: \ bootsect \ type the command "bootsect.exe / nt52 e:" then enter. "E:" is to show your flash drive.
Follow this:


When finished and then close the window bootsect. Once again DO NOT CLOSE THE DOS WINDOW MOST FIRST earlier.
VI. In the DOS window type 1 to drive into the drive where the location of the Master XP CD is located.


VII. Option 2 skip aja
VIII. Option 3 to determine the location of your flash drive

IX. Options 4 to start the process of making flash Boot Install XP.
Then if it appears a window with a YES answer a request or if there is Press Any Key To Continue, press any key. So until the finish.


Good luck .....
READ MORE - how to install XP with flasdisk?

  • Digg
  • Del.icio.us
  • StumbleUpon
  • Reddit
  • RSS

Setting Blog On Blogger

The first thing you do is important for your blog in blogger has a good performance is to do some setting or settings. As the inspiration of how to do the settings in blogger blog, write the following column Tutorial on how bloggers blog settings (make sure you (make sure you choose Indonesian to conform with the tutorial below):

* Please login to blogger with your ID.* Click on Settings.
 pengaturan blog di blogger 
* You should see the tabs menu contains things that should be set:
menu pengaturan blog di blogspot

Base

Some settings in the menu Basic:

    
* Tools Blog: Import facilities dominated blogs → this is to import data from your computer (this is usually done when the transfer is the blog) do not have the clicks, leave it alone. Export blog>> This is a facility for exporting data from the server blogger blogs to your computer. This facility also known as blogs Backup facility. It is recommended that you make backups of your data to your computer, at least once a week. Data backup at any time can be useful when you want to transfer to other blogs on blogger, or it could be to migrate to another blog engine like Wordpress. Delete blog> Facility to delete your blog. If you do not intend to delete the blog, then do occasionally click on this link.
    
* Title: content with the title of the blog you want. Example: My personal blog
    
* Description: content with the description of the blog you want to display, this should not be left blank filled. Example: my little note that is unique.
    
* Add your blog to our list? : Recommended to select an option Yes.
    
* Let the search engines find your blog? : Select Yes, for your blog can be indexed by search engines such as Google, Yahoo or Bing.
    
* Show Quick Editing on your Blog? : May select Yes or No.
    
* Show Email Post Links? : This icon of the email, if you want to blog visitors to easily send emails to their friends about your blog, then Select Yes. But if not, please select No.
    
* Adult Content? : If your blog will contain things like adult besifat featuring articles, pictures, or videos sexy women, etc. then select Yes. However, if your blog contains things that secure access by small children, select No. For the record, if you select the option Yes, then later on when accessed your blog will be no warning that contain adult content.
    
* Select the entry editor: This is the choice for the post editor. 
Editor updated → This is the latest post editor owned by bloggers, many new facilities are integrated in the post editor is like the More button to cut out the article on your blog. Editor old → old editor of this is post from blogger but still you can use, there are several toolbars contained in the old post editor, but is not available anymore in the new post editor, so please choose which one you want. Hide modes this option → special preparation for those of you who are proficient with HTML code, if you have not mastered about HTML, do not use this editor post.
    
* Enable transliteration? : Select Enable if you want to support the post editor to translate Hindi, Kannada, Malayalam, Tamil, or Telugu. Select Disable if you do not want to post editor is language translation.
    
* End the Basic menu settings with the click SAVE SETTINGS.

Publish

This is a facility to change your domain name in blogger with your own domain name. For example: http://namabloganda.blogspot.com be http://namabloganda.com.For the time do not do anything on this published menu. Learn about custom domain on blogger you can read the article How Custom Domains in Blogger.

Format

Some of the settings in the Format menu:

    
* Show as much as possible: write the number of posts that want to appear on the front page of your blog. Example: 5. For dropdown selection is advisable to choose the post option, do not today.
    
* Date Header Format: Select the date format you like.
    
* Archive Index Date Format: select the display format files you want.
    
* Timestamp Format: Select the clock display format that you like. Hours here are the notes of time when your article is published on the blog.
    
* Time Zone: Sesuikan to the time zone where your place is located.
    
* Language: Select the language used for your blog.
    
* Convert line breaks: this is a line break facility automatically when you click enter when making a post. The facility is in use if your future will not be posted on the codes such as HTML and others. Select No, if you intend later will insert HTML code into your post post, for example if your content contains language tutorial HTML, PHP and others.
    
* See Field Title: Select Yes or No is also no problem.
    
* Show column Link: Select No or Yes also no problem.
    
* Enable float alignment: Select Yes, this is so that the image can be adjusted its position in the post. However, if this option will interfere with the appearance of your blog, just select No.
    
* Template entry: This is a facility for the contents of the template entries will always appear at the time of posting. Usually this facility is often used for the signature of blogs, namely the writing or signature is stored in the Template code entries, so that when you make a post, signature code will automatically appear without having to write it repeatedly.
    
* End the Format menu settings with the click SAVE SETTINGS

Coment

Some settings in the menus Comments:

    
* Comment: Select the Show, if you want to post there can be commented by the visitors. Select the Hide, if you post articles that do not want the commentary by visitors.
    
* Who Can Commenting? : Anyone - includes Anonymous Users → to this option, then anyone can comment, including anonymous users or without a clear identity. Registered users - including OpenID → only registered users who can comment on your article, which includes Registered Users are those who has an account on Google, Live Journal, WordPress, Type pad, AIM, and OpenID. Users with Google Accounts → All I can comment only those who have a google account. Only members of this blog → Only members of your blog that can be commented, is usually used if your blog is for certain communities, eg education community.
    
* Placement Feedback Form: full page → page of your blog will override the comments box when a visitor clicks the link comments. → popup comment box will appear in a new window when there are visitors who click the comment link. Embeddable under entry → comment box will automatically be displayed directly under the articles you post, so that visitors can directly memeberikan comment without having to click the comment link. Format comments box of the most widely preferred by bloggers is embeddable below posts.
    
* Comments Default for Posts: select the new entry has a comment if you want to post any article comments box, but any time you can just turn off this function when posting. Select the new entry does not have an article post a comment if you do not want to have the comment box, but any time you could bring this function when posting.
    
* Tautbalik: Select Show if you want to display links to websites that make the link to the article that you created. Select Hide if you do not want to display links to websites that make the link to the article that you created.
    
* Congenital Tautbalik for Posts: select the new entry has Tautbalik if every article that has posted Backlinks. Select the new entry does not have Tautbalik if every article in the post do not want to have backlinks.
    
* Comments Timestamp Format: select the comment date display format you prefer.
    
* Message Comments Form: Write the message you want to appear above the comment box. For example: Please comment, but still keep the decency to not make comment spam.
    
* Moderate comments: Select Always if you want to enter any comments in advance by your moderation. Select Only on posts older than if you want to comment on posts terhadapat moderation in advance of an age you specify. Select Never, if the incoming comments in moderation does not want first and your blog will appear immediately. Do not forget to include your email address, if when there are people who will know your comments via email. Or empty it if you do not want to receive email notification of comments.
    
* Show word verification for comments? : Select Yes if you want to display the verification letters when someone commented, this option is to prevent against spam robots script that can bombard your blog with comments, although this option has a shortage of your blog visitors are usually reluctant to comment because it was complicated when commenting. Select Yes if you do not want to display the letters of verification, this option is less susceptible to spam robots script, but normally visitors would prefer to comment because it is easy to do.
    
* Show profile images on comments? : Select Yes if you want to display images in kometar profile comment. Select No if you do not want to display the image profile giver comment.
    
* Email Notification Comments: Enter the email address you want to send notification when there is a comment. The maximum number of email that can receive is 10 emails.
    
*
End the feedback menu settings with the click SAVE SETTINGS.

Archive

Some settings in the menu Archive:

    
* Frequency Archive: select records that want to show whether the Archive does not exist, Daily, Weekly, or Monthly. It is recommended to choose Each Month.
    
* Enable Post Pages? : Please select Yes or No.
    
* End the Archive menu settings with the click SAVE SETTINGS.

Feed Site

Some settings in the menu Site Feed:

    
* Allow Blog Feeds: Please select None, Brief, or Full. It is recommended to select the Full option.
    
* Post URL Changing the Direction of Feed: fill with your own feed address, this is if you have done such a feed burner with Feedburner. But if you do not have, please just emptied first. For the discussion will feed burner in the post in the next post.
    
* Post Feed Footer: Fill in the code that wants to look at the post feed footer. If you have not understood just emptied first.

Email & Seluler

To post an article into your blog, not only through the post editor in blogger. However, you also can post articles via email or your mobile device.Some settings in the menu Email & Mobile:BlogSend Address: write an email address that want to send notifications when you publish an article. Maximum amount that can send is up to 10 pieces of mail, email writing format on separate them with commas (,).Posting via Email Address: create an email address sends bloggers to post from email or mobile device by writing on the box provided. Suppose your email address is contohsaja@gmail.com then you can create an email bloggers become contohsaja.post @ blogger.com or contohsaja.blog @ blogger.com or whatever you think is good. But remember, keep this email address so that others can not post to your blog
alamat pengeposan via email
posting via e-mail addressTo activate this feature, you must select the option Publish emails immediately, it means if you send an email to the address above, it will be directly posted to the blog. If the selected option is Save emails as draft entries, then the email sent will not be immediately published, but will go to the post concept.However, if you do not want to publish via email, select the option Disabled. This function is also chosen with a lot of security reasons.Do not forget to end the menu settings for Email & Mobile with the click SAVE SETTINGS.

OpenID


Here, no one should be set, but notice that your blog address can be used as an OpenID address. What is OpenID? Maybe next time will be discussed.


Permission


In this menu you can add author to the way the invite to the email that you deem appropriate to participate and become a writer in your blog.In Who can see this blog? You can choose anyone who can access your blog. Those options mean that your blog is open to the public or can be opened by anyone. Only people I choose the only people invited by you who can access your blog by logging in first. Only the author of the blog means that only writers who can access the contents of your blog page, Option Only blog authors are also sometimes used when changing the template, so your blog does not look chaotic when changing templates.For a discussion on How to Blog Settings bloggers seem to be enough, what is your opinion about this?
READ MORE - Setting Blog On Blogger

  • Digg
  • Del.icio.us
  • StumbleUpon
  • Reddit
  • RSS

Creating a Text Area in your blog

What is a text area?. To enable you to understand what that text area, please divert your attention to the right column of the screen, under the heading Want tuker link, there is a box that contains text in HTML code, that is what in a text area. Well by looking at examples, then we can say that the Text area is the area or place to store the text or writings by forming a new area. Usually this text area used to store the HTML code or other text to be copied by the visitors.To create a text area, please copy the code below:

<p align="center"><textarea name="code" rows="6" cols="20"> create text or code you want here, then your article will appear later in the text area </textarea></p>

For example :


Description: rows = "6", shows the height of the text area, so if you want the text area to high then please replace the number "6 were the numbers that higher value.
Cols = "20", shows the width of the text area. If you want the text area width then please replace the number "20" was the figure higher value.

Text Area with wearing Highlight
There are other variations of this makes the text area, namely the text area by using the key highlight. with the key highlights of this will make it easier for visitors to copy the entire text or code that is given, because with only one press only on the highlight button above, then the entire text or code in it will be in the highlights and live in copy only. This facility is very useful when the text or code that is given Dalan number of very many and this will reduce the risk tertinggalnya a text or code to be copied. To create a text area using this highlights please copy the HTML code below:

<div><form name="copy"><div align="center"><input onclick="javascript:this.form.txt.focus();this.form.txt.select();" type="button" value="Highlight All"> </div><div align="center"></div><p align="center"><textarea style="WIDTH: 300px; HEIGHT: 144px" name="txt" rows="100" wrap="VIRTUAL" cols="55">simpan tulisan anda di sini, maka tulisan yang anda tulis akan muncul di sini dan siap di copy oleh para pengunjung</textarea></p></div></form>

For example :


That you better understand the code above, I will describe a little. The above code has two elements, namely elements of the code to make the button labeled Highlight All, and the second is a code element to create a text area.
All highlight key elements:

   
1. <div -> said the center shows that the position will be key in the middle, so if you want to position the button located at the edge of the left, just replace the word left. And if you want to be on the edge of the right, just replace the word right.
   
2. <input onclick="javascript:this.form.txt.focus();this.form.txt.selec()"> -> This code means that when the highlight button is clicked, then the entire text is in it will be in highligt (the mark or in block), so you do not alter this paper.
   
3. Value = "Highlight All" -> Highlight All words are words that will appear in the button, so if you want to change this text please replace the word you want.
Element text area:

   
1. <p align="center"> -> This shows that the text area will be in the middle, well if you want the text area you are in the left edge, replace the word center with left, if you want at the right edge, replace the word right .
   
2. <text style="WIDTH: 300px"> -> the word "WIDTH: 300px" shows the width of the text area of 300 pixels, so if you want to shorten or extend the width of the text area, you just replace it with the number you want. eg: "WIDTH: 700px;"
   
3. HEIGHT: 144px -> number "144px" indicates that the text area will have a height of 144 px, so if you want to change lives change that number with the number you want. For example: HEIGHT: 160px.

Sample text area using button highlighted above, contain scripts to protect from the right click on the visitors. scripts are in use if you do not want your writings in the copy and paste by visitors. for interested please copy and insert in your HTML code between the code <HEAD> and </ HEAD> good luck.
READ MORE - Creating a Text Area in your blog

  • Digg
  • Del.icio.us
  • StumbleUpon
  • Reddit
  • RSS

Creating Dropdown Menu on your blog

In the concept of blogs, each post we will automatically be neatly archived each month. Each entered the new moon, like January, the archives in December will appear in the sidebar. The problem is, if we're blogging a year, then the archive from January to December will be lined up in your sidebar. How about a two and three years' time? Practical steps to overcome this is to make the pull-down menu as below:


So, how many months / years we are blogging in blogger / blogspot, the menus are the months they will not meet long and lined up in your sidebar. Who looks just the name of "Archives", it was only after the click, will display the name of the month our archives.
To make this pulldown archives there are two bloggers with a template that is to classical, and new templates. For classic template steps, namely:


  1. Login to blogger.com with your ID
  2. Clik Template
  3. In the sidebar of your blog archives section, there are the following html code:
  4. &<BloggerArchives> 


    <a href="<$BlogArchiveURL$"$gt;'><$BlogArchiveName$></a>


    </BloggerArchives>
  5. Well, replace the code above dg html code below:
  6. <select name="archivemenu"
    onchange="document.location.href=this.options[this.selectedIndex].value;">


    <option selected>- Archives -</option>


    <BloggerArchives>

    <option value="<$BlogArchiveURL$>"><$BlogArchiveName$></option>

    </BloggerArchives>


    </select>
  7. When finished, click Save Changes. When you are DONE, click republish.
  8. End.
For those of you who use the new template, easier pace of :

  1. log in first, of course with your id
  2. clik LAYOUT
  3. clik PAGE ELEMENTS, search elements (box) that reads Blog Archive
  4. clik Edit on the box earlier Blog Archive
  5. In addition to the writing style there are a few radio buttons, select the radio button labeled Dropdown Menu by giving a tick / check
  6. Clik Save Changes
  7. End
Well the above statement is the steps to create a dropdown menu for Archives, which now how do I make a dropdown menu that its inside is the link, I take the example for my own personal Dropdown menu located on the right above that contains the words "blog tutorial ". To make it please you copy the HTML code below:

<form><select name="menu" onchange="window.open(this.options[this.selectedIndex].value,'_blank')"size=1 name=menu><option value=0 selected>
writing here will appear first</OPTION>

<option value="
content with the addresses you want to go "> text here which will appear</option> </select></form>

As an example for this kind Dropdown menu :

<form><select name="menu" onchange="window.open(this.options[this.selectedIndex].value,'_blank')"size=1 name=menu>

<option>- Blog Tutorial -</option>

<option value="http://candra96.blogspot.com/2010/11/panduan-membuat-blog-di-blogspot.html">Cara Buat Blog</option>

<option value="http://candra96.blogspot.com/2010/11/cara-memposting-artikel.html">Posting Artikel</option>

<option value="http://candra96.blogspot.com/2010/10/ubah-blog-nofollow-menjadi-dofollow_26.html">Ubah Blog nofollow</option>

<option value="http://candra96.blogspot.com/2010/10/blogger-emoticons.html">Blogger Emoticons</option>

<option value="http://candra96.blogspot.com/2010/10/menampilkan-label-di-blog.html">Menampilkan Label Blog</option>

<option value="http://candra96.blogspot.com/2010/10/mengganti-template-blog.html">Mengganti Template Blog</option>

<option value="http://candra96.blogspot.com/2010/10/cara-daftar-blog-ke-search-engine.html">Daftar Blog ke Search Engine</option>

</select></form>
The result will be like this :


Easy is not it? Good luck!
READ MORE - Creating Dropdown Menu on your blog

  • Digg
  • Del.icio.us
  • StumbleUpon
  • Reddit
  • RSS

Learning to Install Windows XP

Before you can use your computer, your computer must be installed operating systemfirst. For example Windows XP or Linux or another OS.Here are step-by-step installation of Windows XP Professional ServiceUsing Clean Install ways:1. Change First boot your computer through the Windows XP CDTo set the First boot settings on your computer through the CD drive thenwe must go into the BIOS menu first. The trick Restart your computerthen press the delete button (on keyboard) until the BIOS menu appearslike the picture below.Each computer has its own BIOS exposure. So, what youThis view may berbeza from your computer. However, the concept and principle remainsame.


2. Next select Boot and choose CD-ROM drive and then press ENTERthen press F10 to save BIOS settings that you have fox.

3. Next will show the process of loading the file. Wait until the process is complete


4. "Welcome to Setup" exposed. Press ENTER to install Windows XP first.
 
5. "Windows XP Licensing Agreement. Press F8 to continue.

6. Determine who will use the Windows partition.

In the picture above Unpartitiened 4095 MB space mean size / memoryavailable to make the partition of 4095 MB or 4 GB. So if wecreate two partitions then we must divide the available size in half,In the distribution of partition sizes do not need to be comparable.For example, we created a single partition. The way we press the C key on the keyboard thendisplay will appear as belowBecause only create one partition then just press ENTER.
7. Then the following display will appearPartitions used for the Operating System that is usually the C partition, Okayjust press ENTER to install Windows.


8. Then select Format the partition using the NTFS file system (Quick) orFormat the partition using the options using the NTFS file system,difference if we use the Format the partition using the NTFS filesystem (Quick) faster than Format the partition using the NTFS filesystem. If the partition is still there is data, then do backupsOther andapartisi data before you perform this step.

9. Next will show the process of formatting the file. Wait until this processcompleted.The format must be done carefully, because if you choose the wrongpartitions, the data on that partition will be lost. Highly recommended foruse a UPS when doing format the partition, because if the electricityextinguished when the format take place, it can cause damage toyour hard disk.

10. After formatting is complete, the next system will copy Windows files toHard drive. Wait a while until the process is complete.

11. After the above process is completed, then the system will restart. If at the timeboot prompt appears to boot from CD / DVD, then let
Just, do not press any button on the keyboard.


12. Install process will continue automatically.

13. Determine Regional and language used, click Customize

14. Fill a standard format that will be used and select a location. Then click  OK.


15. Then click 
Next.

16. Fill in your name and organization of data, and then click Next

17. The contents of the product key (produck key) contained in the Windows package, then click Next.

18. Then click Next.

19. Determine the time (Time Zone). Indonesia has the Time Zone DataGMT 7. Then click Next.

20. Next, wait while the Install process enters its final stage.


21. The system will restart by itself.


22. The first time Windows XP to earnestly, screen resolution, you will be changedfollow suitability. Click OK.

23. Then click Next.

24. Next select Not right now, and then click Next.

25. Windows will try to impress your Internet connection. You mayleave this step by clicking on Skip.


26. Next select No, Remind me every Few days, and then click Next.

27. Fill in the name of your computer. Next click Next.

28. Then click Finish.

29. Currently, Windows XP has been install on your computer.
After Windows is finished di_Install, the next step is; ah-install filehardware driver files (hardware) installed / connected in the computer,
such as VGA cards, modems, TV cards, printers, scanners, and others. In somehardware that is supported Windows XP, the drivers will automatically be installedmanually
READ MORE - Learning to Install Windows XP

  • Digg
  • Del.icio.us
  • StumbleUpon
  • Reddit
  • RSS